Dedicated servers in Medieval Engineers allow players to connect to a third party host, rather than using a player-host, in a peer-to-peer set-up. They are game instances intended for long time multiplayer games. They don’t depend on any player and they run without render and visual/audio effects. This will result to a faster connection and a more fluid multiplayer performance with less lag.
Dedicated servers are available for free. You don’t need an extra Steam account. The dedicated server software is included with Medieval Engineers installs but is also offered as a free separate download from Steam tools.
OFFICIAL DEDICATED SERVERS HOSTS
If you don’t want to host a dedicated server yourself, you can rent one from our official hosts.
DEDICATED SERVER GUIDE
REQUIREMENTS
A Windows PC with administrator account (only if the server will be run as a service)
.NET redistributable (version 4.6.1 or higher)
Static IP address, if you intend to host the game publicly, so that anyone from the Internet can connect to it
INSTALLATION
On a PC with Steam and Medieval Engineers installed – Congratulations! You already have the dedicated server installed along with Medieval Engineers, just go to the game’s installation directory (browse to “ C:\Program Files(x86)\Steam\SteamApps\MedievalEngineers” or alternatively right-click on the game in your Steam library, select “Properties” and under the tab “Local Files” click “Browse Local Files…”). In the installation directory, you will find a folder named DedicatedServer(64) with the server’s executable.
On a PC without Steam – Use SteamCMD to download the dedicated server, for free, and follow the instructions below.
Move the SteamCMD exe to the folder in which you want to install it.
Run SteamCMD – it will download additional files the first time you run it.
Type the following example script into the console to download the ME dedicated server application. Replace {Folder} with your desired install location. Relative paths are acceptable but must start with ./
app_update can be run with -beta {BranchName} to download a different branch, or with validate to check all of the files. The example script can be pasted into a text file and run with a single command steamcmd.exe +runscript {FileName}.txt
Additional Notes
The dedicated server must always be stopped and all windows closed before download updates.
If you have added a service, it is recommended that you remove and add the service again after any major update of the game.
If you are unable to install .NET, check that all windows updates and service packs are installed.
QUICK SERVER SETUP
Basic setup as a foreground process
Run MedievalEngineersDedicated.exe
Choose “Local/Console” item in list of servers
Click “Continue to server configuration”
Here you can set variety of options. They work the same way as in the game.
Fill in the name of the server
Press “Save config and start” and you are ready to play
Setup as a service
Run MedievalEngineersDedicated.exe as Administrator
Press the “Add new instance” button
Fill in the name of the service (must be unique system-wide)
Choose the service you just created from the list of server instances
Setup your game the same way as with a foreground process
Pay attention to ports in “Server settings”, as a single port can only be used by one server instance
USER INTERFACE
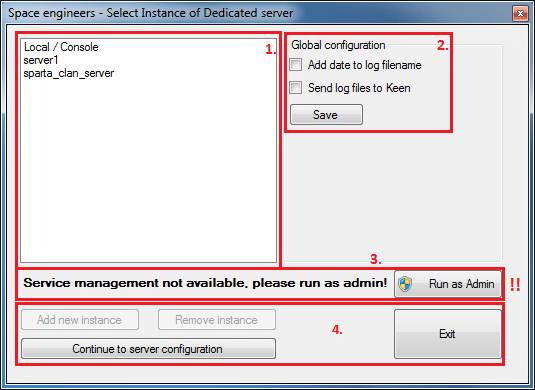
Server list
Here you can see the list of the server instances. There’s always one instance named “Local/Console” and optionally several other instances with custom names. The “Local/Console” instance is run on foreground as a standard application and is always there, while the other instances that the user creates are run in the background as Windows services
Global configuration
Here you can set, whether the game log files should have dates appended to them and whether the server should automatically send the log files to Keen Software House upon crash.
Admin message
This message is shown when the application is not run with administrator rights. If you want to create or manage the server as a service you need administrator rights. The button “Run as Admin” will restart the application with administrator rights.
Buttons
Add new instance – Creates a new instance of the dedicated server as a Windows service.
Remove instance – Removes an instance of the dedicated server
Continue to server configuration – Starts server instance configuration utility for the selected instances
Exit – Closes the configuration utility
SERVER CONFIGURATION
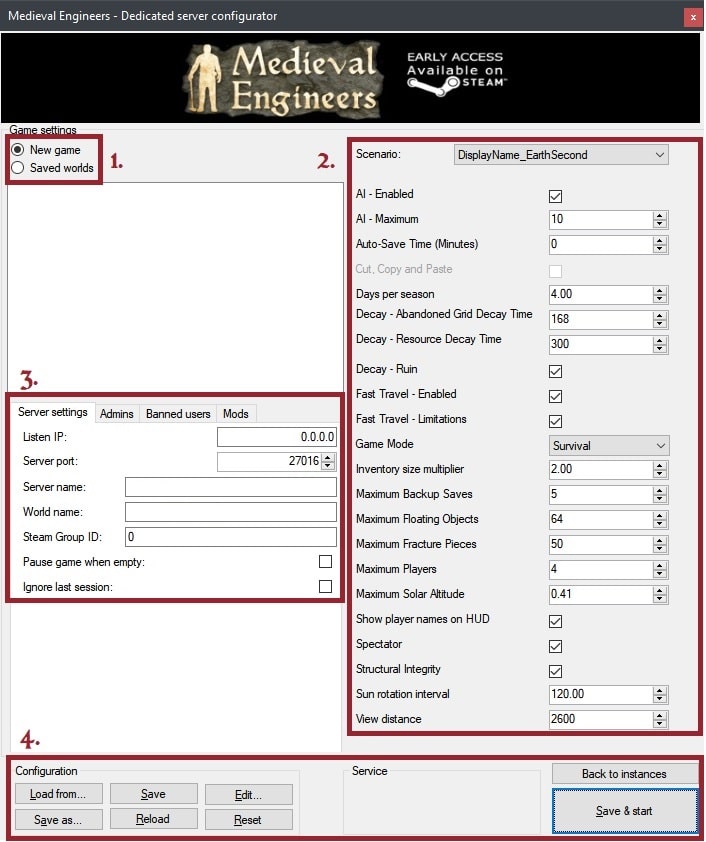
GAME SETTINGS
New game – Start a new world generated from a scenario.
Saved worlds – Load a previously saved world†.
†The previously saved worlds are loaded either from the “%AppData%\Roaming\MedievalEngineersDedicated” folder in your home directory (e.g. “C:\Users\John.Doe”) or from the “%ProgramData%\MedievalEngineersDedicated” folder in the system root. To be able to play a world on the dedicated server that you previously created and saved in the game client, you will have to copy it from your save game directory “%AppData%\Roaming\MedievalEngineers” to the respective folder.
SCENARIO SETTINGS
Scenario – Can only be chosen for the “New game” option.
Other settings work as you know them from the game with the added bonus that you can set the numerical options to any value you want. (Warning: Values out of the range allowed by the game user interface are not tested and officially unsupported. They can seriously affect the game experience and performance)
SERVER SETTINGS
Listen IP – Address of network interface that the server will listen on. This can be set to “0.0.0.0” (which is the default value) to listen on all interfaces, which should work fine in most cases
Server port – Number of the port that the server will listen on
Server name – Name that will be shown in the server list
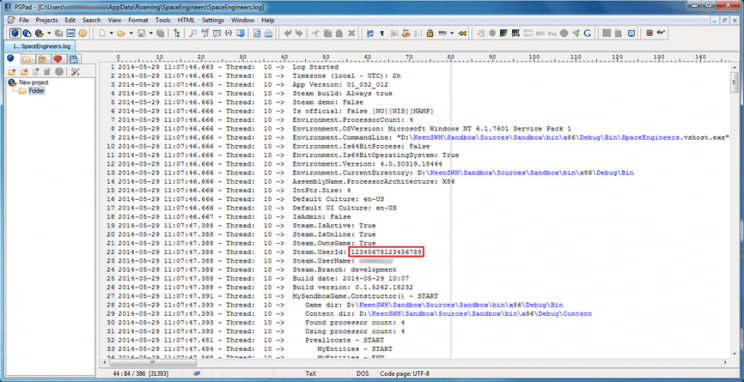
Server admins† – Steam IDs (not nicknames) of the players with administrator privileges on the server (such as kicking and banning other players), each of them on a separate line
Steam Group ID† – If set to non-zero value, the dedicated server will only be visible for the given Steam group
Mods – Write mod id’s here each in a separate line to add in the game
Pause game when empty – This will stop the world simulation when no players are present
†Note: By “Steam ID” we mean the unique numerical identifier for a Steam account in the 64-bit format. Your Steam ID in this format can be found in the game log after running the game with Steam logged-in to your Steam account (see above) or using external tools like http://steamid.co/
BUTTONS
Save – Saves the configuration for the current server instance
Save as… – Saves current configuration under a specified name and in selected folder
Edit… – Opens the current instance’s configuration file in a text editor for manual editing
Save and start – Saves the current configuration and starts the server either as a foreground application or as a system service.
Reload – Reloads data from a current config file
Reset – Resets to the default settings
Restart – Restarts the server instance (only for service instances)
Stop – Stops the server instance (only for service instances)
Back to instances – Returns to the screen with the list of server instances
Exit – Closes the configuration utility (but not the dedicated server, if it is running as a service)
REMOTE API
Before you can connect a Remote Client to your dedicated server(s) you will need to configure the remote API settings and open ports. It is important to note that you must run the dedicated server as an administrator in order for the API to function.* Click the Remote API tab to configure the API
Enable Remote API – Enables or disables the entire remote API.
Enable Public API – Enables read-only API access for users who don’t have the API key.
Remote API Port – The port to use for remote access. This must be unique for each instance that shares the same IP address. 8080 is the default but, because it is an http port, the odds that it is already in use are high. Try increasing to 8081, 8082, etc. if it doesn’t work after everything is configured.
Remote API Key – This is the password to access the admin controls through the remote API. It must follow a very strict secure format.
Generate Remote API Key – This fills the Remote API Key text box with a randomly generated key.
When the server starts you should see “Remote Server Listener started. Listening on port ____”
The remote API can alternately be configured using the MedievalEngineers-Dedicated.cfg file.
You can test LOCAL access with a web browser using a URL formatted as follows http://localhost:PORT/vrageremote/v1/server/ping. You should receive a “Data” response with a “Result” : “Pong”.
*If you are unable to run your server as an admin because it is on a rented server host then you should contact your server host’s technical support to enable use of this feature. The server has to be run with administrator priviledges and the required ports need to be opened as explained below.
COMMAND LINE TOOL
You can run MedievalEngineersDedicated.exe with the following arguments
console – skips instance selection dialog, dedicated server configuration dialog, and goes directly to console application
noconsole – will run without black console window
path – will load config and store all files in path specified (“D:\Whatever\Something” in example)
ignorelastsession – ignores last automatic save of the world and uses values from config file
maxPlayers – overrides maximum players that can be in session
ip – overrides ip address of dedicated server stored in config file
port – overrides port value stored in config file
taskkill /IM MedievalEngineersDedicated.exe – this will stop dedicated server correctly, saving the world etcto stop it immediately add argument “/f”, that will kill server without asking to stop and without saving the world
ADDITIONAL COMMAND LINE NOTES
We still get a lot of questions about automating start, stop, and restart for servers. There is no easy answer to this right now. Differences in Windows Server versions have different behaviors. Some users run console instances and some run service instances.
CONSOLE INSTANCES
These are a little limited. The are simply a task that runs and they have no input except through the console window. Automation options are only to kill the task as above. If you are running multiple console servers, selecting a specific one to kill is a challenge we haven’t yet solved.
Stop – task kill /IM exe_name (waits) or taskkill /F /IM exe_name (instant, no save will be made)
Start – launch from command line or configurator
Restart – taskkill and start again
SERVICE INSTANCES
Services are much easier to automate but also can have more difficulties. In more recent versions of Windows Server, services can only be managed with administrator access. The workaround for this is to set up tasks in Task Scheduler with the needed permissions. These can be triggered automatically or manually as-needed.
Start – net start service_name /y
Stop – net stop service_name /y (waits for server to close: will wait forever if the server doesn’t shut down) or taskkill /F /IM exe_name (instant, no save will be made)
Restart – net stop (or taskkill /F) and net start
ADVANCED USAGE OF TASKKILL
The /F attribute is optional for consoles but is required for services. You can not shut down a service normally with taskkill. The closest substitute is net stop but it is less reliable because it relies on the service itself to handle everything. This means that if there is any issue that prevents the full shutdown of the service, it will never shut down.
taskkill /F /IM exe_name – kills all instances that use the executable (as used above)
taskkill /F /FI “WindowTitle eq window_name” – kills all windows that match the window name. This can be used on configurator windows.
taskkill /F “tokens=3” %%A IN (‘sc queryex service_name ^| findstr PID’) DO SET pid=%%A taskkill /F /PID %pid% kills the specific service by first finding the PID for the service and then killing the PID.
CHANGING DATA DIRECTORY ON DEDICATED SERVER
To change data directory for dedicated server, mklink command may be used.
Make sure ‘D:\Something\DirForData’ exists
Make sure ‘C:\ProgramData\MedievalEngineersDedicated’ does not exists
Run command: mklink /J C:\ProgramData\MedievalEngineersDedicated D:\Something\DirForData
Static IP – If you intend to run a game that people from all over the Internet can connect to, you will need a static public IP address. Your internet service provider should tell you whether you have one or not. Without the static IP address, you will be able to host a dedicated server on your LAN, but people from outside the LAN won’t be able to connect to it reliably.
Port forwarding – The game uses UDP protocol to communicate. The default listen port is 27016, but this can be changed in the config tool. In order for people to be able to reach your server, you will have to configure your router to forward all incoming UDP traffic on port 27016 (or any other that you have specified) to the computer where your dedicated server is running.
Firewall settings – Make sure to set the firewall on your server computer to allow incoming UDP traffic on the listen port.
HOW TO FIND YOUR GROUP ID
If you want to find your Group ID, this is a way how to do it:
Firstly you will need to create a Steam Group and set the ‘custom url’.
Then it will have an URL like this https://steamcommunity.com/groups/<GroupName> e.g. https://steamcommunity.com/groups/rps
Change it to look like this https://steamcommunity.com/groups/<GroupName>/memberslistxml/?xml=1 e.g. https://steamcommunity.com/groups/rps/memberslistxml/?xml=1
Navigate to your new URL in your web browser
You will want to grab the long number within the <groupID64> tags.
We’ve highlighted the number within the Image below to show what section you need to grab from your own webpage.
PROBLEMS LOADING WORLDS ON RENTED SERVERS
Configuration in MedievalEngineers-Dedicated.cfg If you are using a rented server and don’t have access to the configurator app (usually there is a web interface provided instead) you may have to enter the location of the save in the MedievalEngineers-Dedicated.cfg file. Most server providers offer access to this file through some means. Its default location is in C:\ProgramData\MedievalEngineersDedicated\.
Enter the save location in the LoadWorld tag. The full path to the save must be used i.e. <LoadWorld>C:\Users\{user name}\AppData\Roaming\MedievalEngineersDedicated\Saves\{save name}</LoadWorld> or <LoadWorld>C:\ProgramData\MedievalEngineersDedicated\{server name}\Saves\{save name}.If the full path is unknown, it can be searched for by opening the LastLoaded.sbl from the saves folder. Each of the previous saves that were loaded will be listed as key values with the full path.